
Original Draft 2020-09-27
Although I've played a few, what I consider 'real' missions previously I haven't been applying any upgrades or anything to the crews etc though I did recorded the loot that was found. In part this was because I was not entirely happy with the challenge level of my soloing experience (i.e. it was a bit easy and easy to milk-run the scenarios, even though it was still enjoyable from a narrative viewpoint).
I ran 1.25 missions yesterday using some 'advanced' homebrew solo rules and went on to apply some upgrades purchased with today's mission loot - they were well earned I think.


And Bandits from the North.

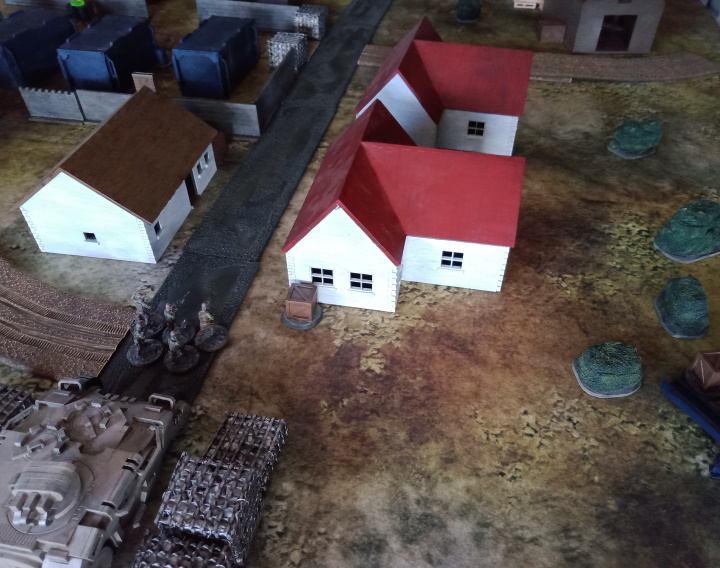
The main road was rapidly becoming a shooting gallery as the last of the crew makes it to the Exfil zone. KNIFE takes another hit (and another Med-kit later) before stumbling into the APC.
The APC's engines roar and it lurches down the road crushing bandits and zombies with satisfying crunchy impacts on the chassis.
And that was the first mission done.
For the second mission I adjusted the board to be another section of the village.

Threat Level 2 again - i'll probably stick with this for the time being and with this board size - it just takes so damn long traversing the board that you use up 2-turn-there/2-turns-back just moving around the board. In a 2 player game you're probably going to be operating within 'your own half' a lot more of the time i'm guessing.
Crashed drone in a barn.
Upgrades...
The missions were quite lucrative (I only realised that TL2 gave better booty today, derp).
With the proceeds SCROUNGER received an anomaly detector to make the searches a bit safer. Three of the crew also picked up Load Carrying Vests (extra equipment slots) and Kevlar (better armour). Additionally everyone upgraded their back up weapon from knife to shotgun. All the consumables (Med-kits/Electric Juice) were replaced.
A couple more missions should get everyone optimised.
Additionally the first mission earned the crew enough 'advance points' for a 'level up' so SNIPER received a +1" movement so he wouldn't lag behind.
General Notes...
Speaking of... i was struggling to find much use for SNIPER on these boards. The layouts, the LoS breaking terrain, and the lack of high vantage points meant that finding a worthwhile long-distance place to sit and overwatch was quite difficult. I'd potentially like to swap the Sniper Rifle with a Battle Rifle, but perhaps his new shotgun will make him a bit more versatile in the tighter maps. I don't really want to remodel this already remodelled model... yeah.
I was also able to find legitimate uses for the Electric Juice that most of the crew carries - and remembered to use it. This swung the mission in worthwhile directions on a couple of occasions. And the cooldown afterward didn't really prove a major hinderance to the crews plans. Very worthwhile.
Rule Changes...
One of my goals with this session was the really put the hostile AI and solo changes I've been working on to the test - and in generally it was very successful.
plus...
[Note: these are still an ongoing WIP and I've made several changes even since these games were played, mainly to the Hostile AI section]
The changes included:
Control Phase: During the control phase (7 +d3 turns) every second turn you roll to see if roaming bands of hostiles arrive from the board edges. I managed to remember this and it added some extra tension/suspense though i was very lucky and didn't get any extra hostile reinforcements.
Hostile Phase: After your Control Phase ends you roll to generate hostile reinforcements from the board edges, Hot Spots and Mission Objective (9 potential danger points on TL2). I only got to do this during game 1 due to game 2 being cut short. There were 2 'hostile turns' before the crew were exfil'd and 2 groups of hostiles appeared on each of those 2 turns. This added a lot of motivation to get out of dodge asap - the longer you stick around the more critters are going to swarm in.
The hostiles arrived along the top of the board near the exfil zone and at the MO which had only just been cleared, which meant that the exfil zone was now semi-hostile and the crew just leaving the MO were immediately being chased down (fortunately by slower zombies). A sudden change of events.
Cover fire from the crew already at the APC helped control their flight but more reinforcements arrived in the 2nd hostile turn (bandits this time, and being shot at is always risky).
In general these changes worked better than expected: i) it's super-motivating in terms of playing the mission right up until you're back in the APC (or eq), ii) planning your escape route and what objectives you can hit before the objectives turn sour, iii) and really keeping your eye on the turn counter.
No just letting the turn counter wind down and you're done - the mission is definitely not over until that armoured door clangs shut.
AI Handling: While i have been working on better AI handling rules i was able to work on some general theories during the games (mainly because the hostiles had 2 actions each - hard to really work much out with just 1 action available @TL1).
Rat and Zombie -> Unintelligent AI, when they deploy, they immediately move toward the Player models.
Bandits -> Intelligent AI, when they deploy, they roll initiative to see if they attack or seek cover.
In general combat...
Bandits were either move+shoot to get a Player model into range/LoS or shoot+shoot if they already had LoS.
Rats and Zombies were either move+move or move+melee or melee+melee based on the player model situation. They were always moving forward, i.e. not looking for cover - makes sense for Zombies or aggressive Rats.
The only consideration i had to make was when there were 2 Player models in B2B with the Rats. 1 Player model was incapacitated the other was still fighting. The Rat targeted the active model over the incapacitated model, on the logical premise that the active model was still swinging at it and pissing it off.
If the Rat has been in B2B with an incapacitated model the new Unintelligent rules would have had it attacking it again rather than moving toward a model shooting at it from range. Bandits would probably have bypassed the incapacitated model.
The AI handling seemed fairly intuitive and didn't really require a great deal of contemplation at the time. I guess my overall goal is just to quantify and systemise what 'makes sense' so it can just be formulaically applied without having to ponder it all the time. Progress is being made there. It's not a hugely complex puzzle, it's just working out "what are the rules being applied 'instinctively' when this combat etc happens?"
Also wanted to point out that it's not intended as a criticism of the original/official rules. I'm very much making something that works better for my play sessions and if this option works for other people too then all the better.
Overall it was a successful session. The mission had good narrative flow (very important) and it had far more suspense points than the previous games. The end of game 1 was super-tense. Fantastic!
Final Points...
This is my near complete bag of tricks for playing ZA...

Until next time...
No comments:
Post a Comment