Session at Good Games at Top Ryde yesterday evening.
Approximately 1k points of marines vs tzeentch flavoured chaos.
This was my... second... game with the Angel Spear fleet and i think they did ok, though i was planning a lot more boarding actions than actually came about... such are dice games.
We were playing a blockade run scenario (soooo much more enjoyable than musket-line battles), where the chaos were trying to get across the board by end of turn 6, and the marines are trying to stop as many of them as possible.
Marines start with full ahead for just about everything, then drop out a preemptive screen of thunderhawks (ordinance, not shown here).
Chaos split into 2 groups with the desolator-class battleship, devastation-class cruiser and infidel-class escort group booting down the (player's) left flank, and a pair of murder-class cruisers taking the middle (read: sacrificial).
The marines are sorely outgunned with 30cm guns across the board, while chaos is averaging 45cm/60cm. The strike cruisers take a couple of hits each and the (token) nova-class escorts are destroyed without firing a shot.
The murders are set upon by the battle barge and 2 strike cruisers at close range, while a lone strike cruiser harries the battleship (but not much).
The battle barge boards a chaos cruiser and destroys it fairly convincingly. The other cruiser is destroyed mainly by critical damage (fires etc) inflicted by bombardment cannons and thunderhawks.
The desolator battleship is long gone but the remaining devastation cruiser and infidels decide to have a parting shot at the marines. The lone strike cruiser was shot to pieces and drifting-hulk'd off the board..
And then turned for a dash at the edge.
The battle barge is way to far from the action by this stage but the 2 remaining strike cruisers set out after the carrier cruiser, and manage to destroy the infidels with thunderhawks.
The devastation manages to full ahead and escape, though not quite reaching the edge of the board... and that was the end of turn 6.
Was a fun game with lots of manoeuvring and dynamic shifts of fortune. We had new asteroids and planet terrain which added to the experience.
Until next time...
[Original Draft - 20190729]
[note: blogger is giving me grief with formatting (especially multi-session posts)... I've tried fixing bits up but after a while it gets too frustrating. So, sorry if some paragraphs are larger or smaller than others... like this one. Editing the raw html for the page is entirely not feasible given the massive number of elements/tags used.]
Definitely going to be a WIP build log but will edit once done with the build.
I mentioned previously the idea of making some additional industrial type pieces for that style board.
The main, additional 'theme' was agriworld size pipeline.
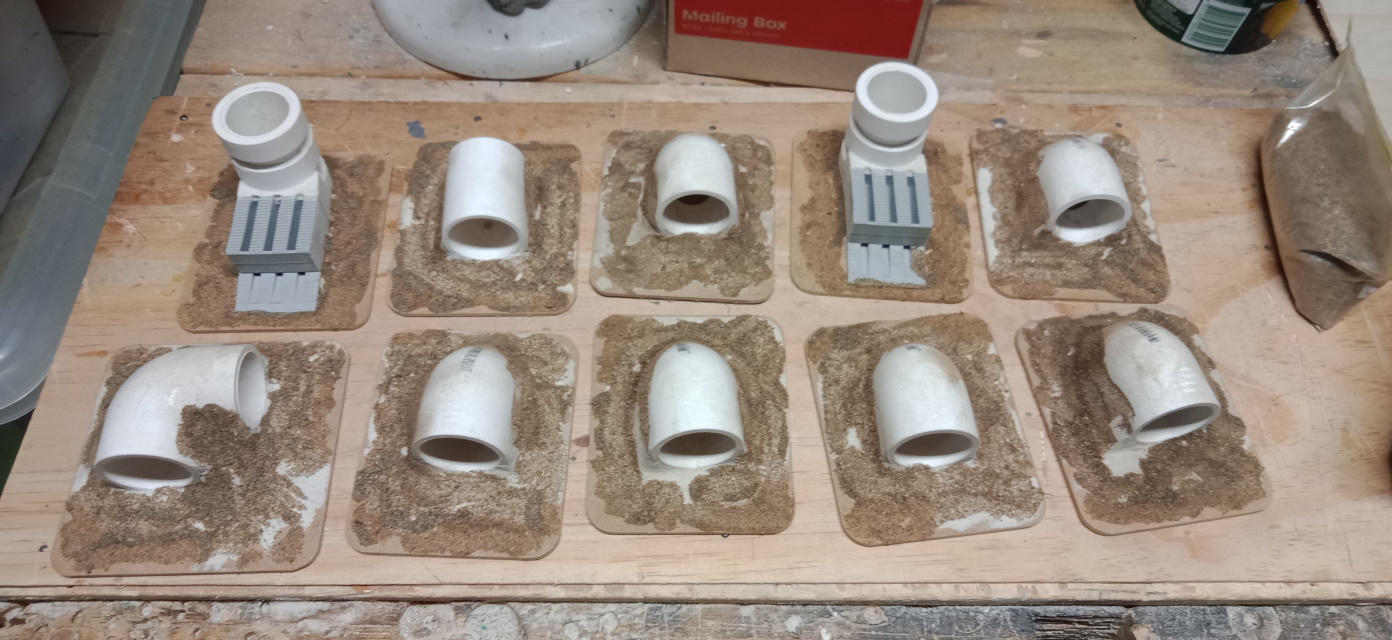
With the printer on sabbatical i got some raw materials and made a start.
Coasters and pipe connectors...
The idea is for the pipe to sit as close to the table as possible. Yes, technically it would allow a 6mm dude to leopard crawl underneath, but the idea is for impassible terrain... sometimes at 6mm you have to 'counts as' and/or suspension of disbelief a bit.
So i marked off the connectors as appropriate then hacksawed off some excess (but held onto them)... these are then sanded down to the appropriate height.
Bought a bunch of cheap epoxy to glue them solidly to the coaster. Am contemplating drilling around the base, then taping it up so that the liquid glue can 'key' into the connector solidly.
The idea is that there will be 6x end connectors (going back down into the ground), 1x 90o connector, and 1x through connector.
Extras
Those off-cuts gave me an idea for some extra structures. i had some left over coasters after cutting the custom one for the 90o piece from the place mat.
The offcuts are attached to a straight piece of pipe (not a long piece) which form what i thought of as a (nuclear) 'cooling tower'-esque structure. Will probably leave these open at the top, standard textured stone paint inside and out and then at the bottom have a pool of resin as 'water'...
So these by themselves weren't enough so i looked around the workshop and some building wedges caught my eye. These are unlikely to seem an use in the immediate future so pinched a couple.
Cut, glued, sanded, filed and formed what i see as a 'filtration' structure.
Fluff-wise these could be testing stations for the pipe system, or filter off water for a local population or something. Nothing spectacular but fills out the coaster a little better.
day 2 (or there abouts)
The majority of the assembly work was done yesterday evening. Cut the end connectors flush to the ground. sanded off all the embossed text, gave everything a light sand to key the surface to better hold paint, put flat (kinda) surfaces on the thru connector and L connector.
Drilled holes near the points that were to be glued to create 'glue hooks', and then taped up the outsides so the glue didn't pour out.
Mixed up the epoxy and placed it in the hold points. Greatly underestimated the amount of glue i'd need. Will probably pick up another couple of tubes on the way home.
I was potentially hoping to have these with the glue up to the flow out point.
However, after curing over night all of the end connectors and the cooling tower pieces are pretty damn solid.
Only the thru and L connectors are iffy, due to being connected by the hook holes only. These will definitely need epoxy globbed on the outside to solidify the pieces.
These are the cooling 'tower/filtration plant' pieces. Epoxy poured in. the piece will rip off the mdf before it falls off for sure.
The filtration structures aren't glued on yet.
Tape removed. the Holes will be patched with wall filler/plaster.
Not entirely sure what i'm going to do with the filtration structure. am considering plastering it through onto the cooling tower. wall filler should do the trick. so it will be a single structure. Have tried positioning the pieces around a bit but nothing really popped.
So this was post-cure this morning. A little more epoxy required before moving on to plaster.
day 3
The resin for most of the pieces is SUPER-strong hey. There's no way these are coming off so didn't bother applying any more on the outside or anywhere.
Started bogging up the pieces with wall gap filler.
Will wait for these to dry and solidify then do another layer over that. Partially about gap filling, partially for looks. These are artistic/fun ones.
Onto the cooling towers. The filtration structures were epoxied on and then bog applied. Not entirely sure how i'm going to finish the connection/transition points for these.
And finally the other connection points.
Epoxied up the bases. should be strong enough. Ran out of wall filler so these stayed like this. Will get some more filler on the way home.
The thru connector has some embossed text on the end which i missed before - to be sanded off.
Terrain Rules: So how do these objects play on the table?
They count as impassible terrain. No going under, no going over or sitting on top.
As per the other (building) structure terrain i've made these are not area terrain so it uses true line of sight around whatever features are on the coaster.
Support Fire: There is a dumb rule with the current version that if you are within 15cm of an enemy formation you can provide supporting fire even if you have no line of sight. Dumb but that's the rule. Whatever applies for impassible terrain applies here.
I think if you're halfway down a full pipeline you should probably exercise a bit of players honour/discretion and refuse to use this busted-ass rule.
day 4
Extra plaster. Bit of cleanup.
day 5 (or there abouts)
Brush on some wood-glue fairly randomly, then sprinkle on some mid-to-course sand...
After they're starting to congeal remove and tap off the excess...

day 6
Two sprays of the matt charcoal then one spray of 'beaten metal', all within a couple of hours, set really quick as the weather was unseasonably warm. Pretty much as anticipated visually.
day 7
Done.
day... later
Time passes. Really want these off my hobby zone by the weekend. Have been putting off printing while I've got these potentially dusty (mdf/plaster) items in the works.
They've made it to the paint desk which usually means the structural stuff is done.
The pipes have had a few washes just to break up the flat planes (not hugely happy with the result but done caring).
The pipes and the connector bits that are pvc are getting a coat of stormshield (clear finish, for protection) and they're done (enough).
The connector pieces are getting some 'leak' painted on just to add some interest and break up the ground colour (this is done), and will then get some tufts... because i like tufts, and we'll assume the moisture has promoted some vegetation despite the otherwise arid environs.
The filtration/coolers have also had some 'leak' work, and are also getting some decorative 'boulders'. Once these are dry brushed etc they will also get some tufts.
Fluffy-wise i don't want these to be too pristine, but still fully serviceable... as in every 50 years a crew comes by, fixes it up, runs the filtration ritual or whatever and then moves onto the next locale.... like sydney trains... or roads...
day LAST !!
Bloody finally!
Finished product. Happy enough with the result.
Generally i'm happy with the size and functionality. Will set up a table sometime soon and get the whole 'industrial set' out.
Didn't check, but a Warhound (depending on era... early were super tiny, latest (AT18) quite large) might be able to see over the top. The weapons might even hang a bit low to draw LOS from the barrels, which is actually quite good. Reavers, Warlords and Revenants should be fine as they're more upright (plus bigger).
As per pics the Defiler (red crab critter) which is quite tall can't see over, and even the Stormraven sits more or less below the top of the cylinder.
The filtration pieces turned out ok. Tuft makes everything better. In the inside of the cooling tower i dropped in some epoxy (glue) making it look like there's liquid still in there, but a very low level.
The various pieces allow a little bit of reconfiguration. This one has a longer pipe length.
This one is two shorter pipe lengths with the straight connector.
And again, two shorter pipe lengths, with the angle connector.
And that's it for terrain for a while (yhay). Can finally give the workbench a clean down and get back to printing.
Until next time...
[Original Draft 20190813]
this one's very much a blog, lots of intermediate steps for my own motivation. not hugely interesting.
Since making these (area terrain) pieces it feels like they (and their associated add on bits) have had a lot of (re)works.
The plan is that i want to create recesses in the terrain so the 'insert' pieces can sit flat on the underlying mdf board. the areas around it will provide a token crater to stop the pieces moving around.
the intended effect is that it should look a bit more integrated with the bases, rather than the add-ons sitting high up on the textured terrain. Actual inserts rather than onserts.
i positioned the add-ons where they look decent (enough). this removes some of the 'casual/place anywhere' aspect but it's prefer it to look integrated and i can't think of a way to have both (standardised insert shapes, of course... but way too late for that now).
i then chiselled the textured layers off the top. wood glue with sand and plaster is remarkably resilient.
i then built up around the insert pieces with plaster.
waited for it to dry and sanded. then filled any gaps and divots around the 'craters'.
there is a bit of a gap between the craters and many of the inserts but i don't think it will mar the effect too much. i wasn't aiming for a super-tight fit, just more or less flush.
put a coat of texture paint on next. found i had a tin of rocky dam still stashed away. too light by comparison to all the other terrain.
then pva glue and sand for extra texture.
suitable...
painting done apollo grey.
a whole bunch of dry brushing later, and finished... yhay...
the rocky inserts are now the wrong colour, so plucked off the tuft grass and repainted them.
and they're done...
i'm also making rocky inserts for all the tree pieces. so they can be swapped as required/desired.
so yeah, project done (as far as the bases go). nothing ground breaking in terms of technique or artistry or anything; just known skill-set reused.
[update: 20190826]
Finished off the extra boulder inserts. Not spectacular, but adds options.
So that's my area terrain FINISHED!!!!
Finished i said, stop picking at it...
Until next time...