

I think this post original started on 2020-07-29.
So, i am watching the last season of 'the last ship' a bunch of post-apocalyptic american military swill. no offence to the actors who did what they could with what they had, or to the american military; it's just dull cookie-cutter entertainment. but i started it...
[ed: finished that off, geez, what a slog.]
anyway, i thought it might be fun to have a dockside ship for my local Zona Australis. After a bunch of searches in the usual mdf terrain makers, i found nothing suitable for the job. Time for an impromptu scratch build project. More research to work out what and how, and along the way i ended up with a sketchup plan of attack.

Kind of looks like a big project but it's just lots of smaller bits patched together, and none of those are overly complex.
The basic plan is 3mm mdf sheets, cut to size, glued up as appropriate, then wall plaster over the top to smooth things out, fill gaps and cover other sins.
The bow is the single most complex piece of the project and consists of 29 individual layers that form the curved shape.

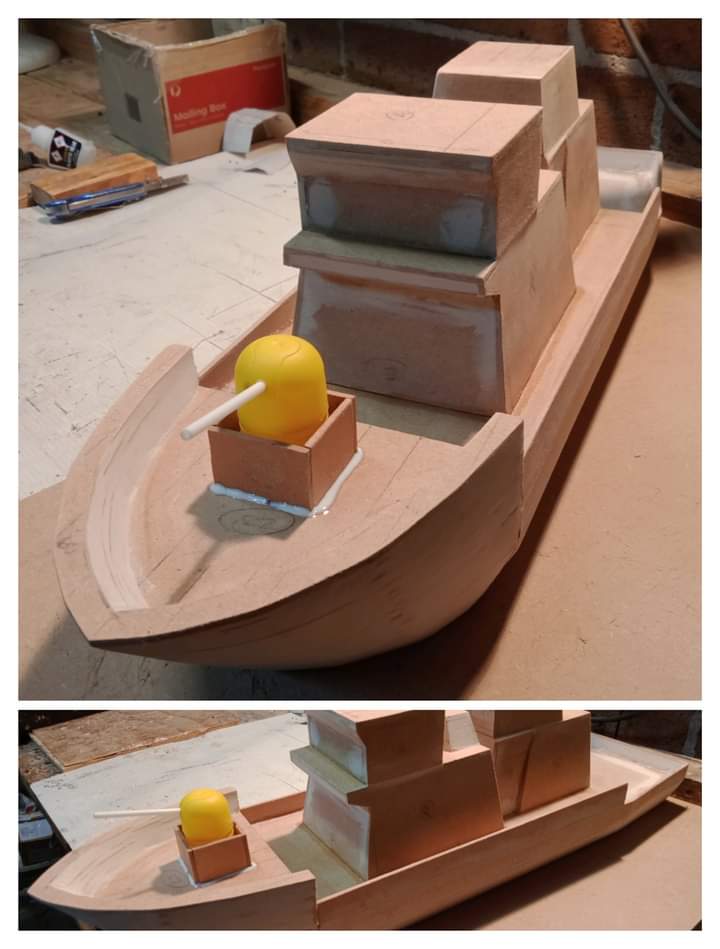
Yes, i've been playing with the collage feature on my phone. Things progressing to plan.
Most of the deck parts were just flattened out on sketchup then i put the dimensions on them and worked from that.
The current web version of sketchup that i'm using doesn't allow flat to-scale prints which is super annoying. i did have a look for alternatives but they were problematic, so old fashion plans won the day. yhay paper for your steadfast reliability.
it would have been great to be able to print up the prow segments but i ended up lofting 29 individual sections which was tiresome but not overly taxing. it definitely has the feel of making an actual, real boat. kind of entertaining.
This shows the glue-up of the prow completed, and the decks being assembled. I used globs of hot glue to get the deck pieces in place then white glue along the seams to try to reinforce everything. Not many square edges or parallel lines on this project but it's turning out ok just from a visual perspective.

Top decks on and some models etc to show some scale.
It's about 60+ cm over all. If i leave the prow as detachable i should be able to fit it into a standard storage box. That would be a good thing.

First layer of chunky plaster on the prow. the decks will also have plaster applied once the glue-up is complete.

And that's about where we're up to.
Need to pattern out the ship's superstructure - this is mainly simple and pyramidal boxes. Should be simple cut and glue.
2020-08-07
results since last i posted.
This is pretty much the final assembly stage. The superstructure pieces have been glued into bigger and bigger elements and finally glued to the deck. I've all but decided that the prow will remain unglued to the main part of the boat to (hopefully) make storage easier. The way it slots in and out is quite sturdy so it's not going to drop off on the game table etc.

There are obviously a few areas that will need bogging up, but gen-er-al-ly it was a pretty good fit. there were various element that needed sanding or filling and i'm 100% sure there's no micro-level symmetry anywhere... but on a holistic level it came together pretty well... doesn't look too wonky, or lopsided or warped or anything. So pretty pleased.

2020-08-11
The container inside a kindersurprise egg and a chupa-chup stick...
A bit more glue, a bit more plaster, a splash of texture paint, and calling it done.

Will need some windows and doors (hatches? portals? yhay for future research) and will probably add some effects like radar/tech gubbins, also some stairs up to the prow perhaps... dunno.
Anyway that's a project for future-self, for now it's complete enough to be a functional board piece without dripping glue or paint or having decks fall off... so... done.
Update 2020-08-16
Had a spare day yesterday so ended up adding smaller detail bits to the ship. This is definitely as much detail as it's getting. it's functional, with enough detail to break up the main surfaces but without too many fiddly bits to snag on.

The prow is still easy to take off for storage. The gun is magnetised and swivels and can be taken out entirely for storage. The radar mast also comes out for storage.

Here we have some of the new Eureka minis to show scale. There's plenty of room for them to sit without falling (i added some ledges and steps between levels). There's also enough cover for them to not be sitting way out in the open.

update ends
update 2020-08-18
i ended up adding some shading (aka ugly speckling) to the ship. it doesn't look too bad. It then got a couple of coats of clear matt varnish to seal and protect it. done.


Something else that i need to do for this project is make a 'water mat'. something i can put over the terrain mat to be an area of water. probably also a jetty or pier so the ships is accessible. not going to make anything overly large for that though. just a flat walkway and some posts i think.
update ends
update 2020-09-11
This is actually 3 bits of something something.
Early- to mid-stages on the water mat. it now has a bunch of silicon on it. Will be doing a bit more paint and then a final layer of silicon to 'seal' it and also there are some patches that might have missed out. it is messy and annoying to apply so possible there are some unsiliconed sections.

dock, or gangway, not sure of the correct term for this one. ship access ramp thingy in the water. mdf and paddlepop sticks. is probably close enough to complete in terms of construction. will be doing paint on this to hide the shoddy construction.

Since the earlier sets of photos i also added some gubbins to the radar array (screw tops from milk containers).
update ends
update 2020-09-13
Matt black base followed by what i'll refer to as 'scrub over' with steel legion drab. More than enough. Then spray of clear for protection.

Overlay drying, bit of rattle can, then clear silicon. easy-peasy... just a bit stinky.

So, water overlay is now complete. happy with the result. bit hard to photograph it right. it's 60cm wide by 120cm long so long enough to fit a standard board acrossways. and you can always let some overhang and not use the full 60cm width. possibly a tad bluer than i'd planned for (less blue than the pic may imply) as i guess i was aiming a bit darker and greyer, but, in general, pretty happy with the end result. will give it a couple more days out to fully cure then roll and stow.

gangway and water in situ. hoping for a few game hours during the week.

couldn't be bothered rolling dice today but had enough oomph to set up a token board :)

update ends
Until next time... ahoy maties...
No comments:
Post a Comment